Bird’s Eye View

Most of the time you want to keep your head down and stay focused on coding up the task at hand. However, every once in a while it’s nice to see where you have been and get a 10,000 foot view of your code. To that end, the TKE text editor comes with a built-in “Bird’s Eye View” panel that you can hide or show via the View / Bird’s Eye View menu option. This displays a high-level representation of the current editing buffer by displaying your file’s code (syntax highlighting included) on the right-hand side of the editing buffer.

Bird’s Eye Viewer (on right)


In addition to displaying a bird’s eye representation of the file, this pane can also be used for navigating to different points within the file. The following are few tips on using the Bird’s Eye View panel for navigating.

  1. Use the mouse scrollbar, while the cursor is within the panel, to scroll the view panel up and down. This won’t change the editing buffer view.
  2. Holding down the Control key while left/right-clicking in the panel will cause the bird’s eye view to scroll up/down by a screen at a time.
  3. When the cursor is within panel, a translucent background will be displayed to show you what the editing buffer is currently displaying.
  4. Left-click in the panel to jump the editing buffer view to that location within the file.
  5. Left-click and drag in the panel to cause the editing buffer view to change.

As you scroll the editing buffer, the bird’s eye view will automatically adjust itself to make sure that the current editing buffer content is displayed in the bird’s eye view panel.

You can control the font size and width of the Bird’s Eye View panel within Preferences by selecting the View pane. From here you can control whether the panel is always displayed when a file is opened by selecting the Show Bird’s Eye View checkbox. At the bottom of the View panel, you can change the font size of the text used in the panel with the Bird’s Eye View Font Size value selector, and you can change the pixel width of the panel using the Bird’s Eye View Width value selector.

Preference Window View Panel


Important note:
It is recommended that you not enable this feature by default within preferences as it can have a negative impact on the application’s performance. By using the menu option to enable the view, you only display the panel for the current editing buffer, which should keep things moving along nicely while you are using it.

To see more information and download your copy of the TKE code editor, visit http://tke.sourceforge.net.

Bird’s Eye View

Clipboard Snippet Workflow for Markdown

Instead of talking about a TKE feature this week, let’s look at creating a simple but potentially useful workflow that allows us to copy a URL to the clipboard and essentially paste the text as a well-formatted Markdown link, using a snippet.

To create the snippet, open the TKE Preference window (Command-, on Mac or Control-, on other platforms). Select the Snippets panel and make sure that the Language option menu within the Snippets panel is set to “Markdown”. To add a new snippet, click on the Add button and fill in the resulting snippet editor pane as follows:

After giving the snippet an expansion keyword “clipurl” and entering the snippet code, click the Save button at the bottom of the editing panel to save the snippet. The Preference window will change the snippet panel view to show the list of all saved snippets that are specific to the Markdown syntax. You should see your new “clipurl” snippet in the table which will look like:

So what is going on in this snippet text? Well, when we enter the snippet keyword in a Markdown editing buffer, the snippet will grab the contents stored in the clipboard (a URL in this case), it will remove the URL scheme including the “://“ characters and place the remaining contents between a square bracket pair (this is the displayed link name within a Markdown link). It will then output the full URL between a pair of parenthesis (the link URL within a Markdown link).

So now let’s close the preference window and test out the new clipboard snippet. To do that, navigate to a website within your web browser (we’ll use tke.sourceforge.net for this example) and copy the URL from the address bar. Then back in TKE, create a new editing buffer (Command-n or Control-n), set the syntax of the new editing buffer to Markdown, input our new snippet text “clipurl” in the editing buffer and enter the TAB key to expand our snippet which should look as follows:

Cool! It’s a valid Markdown link with the displayed link name being the copied URL name minus the “http://“ syntax, while the full URL exists in the URL portion of the Markdown link. To test the link out, right click on the underlined link name and the link should be displayed within your web browser.

Now whenever you are working on that next great Markdown document, you can quickly create a Markdown link by simply copying a URL to the clipboard and entering “clipurl”. Try thinking about other ways that you can manipulate the clipboard (or even contents in clipboard history) using snippets to increase your editing productivity.

Consider yourself are a certified TKE power user now. Feel free to impress your friends.

To see more information and download your copy of the TKE code editor, visit http://tke.sourceforge.net.

Clipboard Snippet Workflow for Markdown

Text Formatting

When you are editing files with a syntax type that supports text formatting, you can quickly get tired of adding the syntax that is required for doing things like bolding, italicizing, underlining, etc. However, if you are using TKE to do the editing, then your editor has your back.

If you need to italicize some text that you have already typed, simply select the text and use the Edit / Format / Italics (or use the shortcut Command/Control-I). TKE will insert the correct syntax before or around the text. This functionality is super handy and will save a ton of keystrokes, but TKE’s text formatting capabilities don’t stop there.

If you need to bold some text that you are about to type, simply select the Edit / Format / Bold (or using the shortcut Command/Control-B). TKE will insert the proper emboldening syntax and place the cursor at the appropriate spot to start entering the text to be emboldened. Once you have finished entering the formatted text, if there is bold syntax following the text, simply enter the TAB key to move the cursor to the right of that syntax and continue entering text.

Bonus Tip: Any time that you are editing text and you are not filling in a snippet, hitting the TAB key will advance the cursor to the first whitespace character in the current line (unless the cursor is in the first column when the TAB key is entered).

If you need to remove syntax formatting, simply select the text (including the formatting syntax) and then select the Edit / Format / Remove Formatting (or use the Command/Control-minus keyboard shortcut). Any syntax that can be applied via the text formatting feature will be removed from the selected text.

Text formatting support is currently available for the following syntax descriptions:

  • Markdown
  • MultiMarkdown
  • Fountain
  • HTML
  • HelpSystem
  • ManPage
  • Latex

In addition to text formatting options, TKE also supports the following formatting (depending on the availability of the format support in the syntax):

Text Formatting Submenu

Simple, easy, powerful. TKE might just make text formatting fun again.

To see more information and download your copy of the TKE code editor, visit http://tke.sourceforge.net.

Text Formatting

Vim Macro Recording

A quick tip for Vim mode users…

TKE has support for Vim’s macro recording feature when Vim mode is enabled. Vim macros are basically just a recording of some number of keystrokes that the user used while recording is enabled. These recorded macros can then be “played” at any time which will essentially replay the keystrokes within Vim, allowing you to do a lot of repetitive tasks quite quickly within the editor.

There is support for automatic recording (that is, you can repeat the last Vim command at any time just by pressing the ‘.’ key). You can also repeat the last Vim command-line (started by entering ‘:’ when in COMMAND mode), by entering the ‘@’ key followed by the ‘:’ key.

There is also support for recording to multiple macro “registers”. Each register is named by a single letter of the alphabet (i.e., a-z, A-Z as well as the doublequote (“) character). To begin recording keystrokes to a named register, simply enter ‘q’ (when in COMMAND mode) followed by the name of the register to use and then begin entering the keystrokes that you would like to store in the macro register. When you are done entering keystrokes, enter ‘q’ when in COMMAND mode. While you are recording, the information bar at the bottom of the main window will display the recording status and the name of the macro register being recorded into.

Main Window Status Bar Indicating Recording Status


To playback the recorded keystrokes of a register, enter ‘@’ when in COMMAND mode, followed by the name of the register to playback. The keystrokes will be played back immediately.

So if you are Vim user, you probably already know this, but here is the TKE tip for this week….

Vim macros are recordable and usable in any editing buffer within TKE. That means that you could record a macro in one editing buffer and replay that macro in another editing buffer. So if you find yourself performing the same types of tasks in multiple files, do the task once in one buffer and replay the macro in all of the other files. (Insert mind blowing explosion sounds here).

Sweet.

To see more information and download your copy of the TKE code editor, visit http://tke.sourceforge.net.

Vim Macro Recording

Vim Mode

The Vim editor is exceptional in many, many ways, and it has been a staple of many programmers and writers primarily due to its keyboard focused approach to editing and its extensibility and flexibility. Vim is a fantastic editor to use within a terminal because it does not necessitate a graphical user interface and works fairly well when you are spending most of your time within that terminal.

Vim was designed and written at a time when graphical user interfaces were not as mainstream as they are today. I’ll never forget the first few times I attempted to use Vi to edit a file in college. A blank screen with just a cursor staring at me with no instructions for use and, try as I may, typing on the keyboard did practically nothing. I needed to track down someone with knowledge of the editor just to do basic things, and then I needed to commit those first few keystrokes to memory. It’s no wonder that I initially sought out the few graphical editors that were available to me at the time instead of sticking with it. Though Vim’s keyboard-centric editing features, once committed to memory, are incredibly efficient, there are elements of having a graphical user interface that improves on Vim. Ease of learning, discoverability of features, better view modes, and interactions with those features are just some of those improvements.

The marriage of the Vim editing experience and a graphical user interface has been attempted by many editors in the past but many of those editors fall short, relegating Vim mode to a second-class citizen — a plugin of sorts — instead of integrating it into the core experience. There was also many things about gvim (a graphical implementation of a Vim editor) that didn’t seem to work quite right to me.

This is one of the primary reasons TKE was created, to attempt to create a modern editor which integrates deeply with Vim editing functionality. Most editing features added to TKE are implemented for Vim mode first or designed with Vim editing in mind, making sure that Vim editing remains frictionless and central to the TKE editing experience.

If you consider yourself in the Vim camp and are looking for a great graphical Vim editor, give the TKE editor a try. It is hoped that you will find a terrific editing experience with additional superpowers.

To see more information and download your copy of the TKE code editor, visit http://tke.sourceforge.net.

Vim Mode

Line Wrapping

To line wrap or to not line wrap, that is the question! For a long time, TKE did not provide the ability to wrap lines. Why? Well, first of all, line wrapped programming code can be a bit hard to read. Second, it is creating an editing view that may be inconsistent with other users of the file, leading to potential formatting issues (this is the same argument as to why TKE generally replaces TAB characters with spaces when editing). Third, adding a feature like line wrapping can lead to some tricky corner cases in code. Finally, and probably not least, there were other features that TKE’s developers wanted to get into the tool before it 🙂 However, the latest version of TKE (3.2 as of this writing) fully supports line wrapping, so let’s briefly go over how you can put it to work.

Line wrapping support is a feature which is enabled/disabled by each programming language syntax file. So a programming language like C++ will have line wrapping disabled by default while a writing language like Markdown will enable line wrapping by default. You can, at any time and with any language, temporarily override the default line wrapping behavior by toggling the state of the View / Line Wrapping menu option. When line wrapping is enabled, lines will wrap at the editing buffer ruler location (which is controllable in the Preferences window in the Editor panel).

If you want the line wrapping behavior to be remembered between invocations of TKE, you can do so in the Preferences window within the View panel. Here you can set how TKE should determine the line wrapping state using the Line Wrapping Default option menu at the bottom of the panel. The three option values are as follows:

  • syntax: Use the syntax-specified line wrapping indication to dictate if line wrapping should be enabled or disabled.
  • enable: Always enable line wrapping mode.
  • disable: Always disable line wrapping mode.

For Vim users, wrapped lines offer a few additional cursor motion commands which are as follows (note that logical lines share the same line number within the file but displayed lines are created due to wrapping):

  • g0: Moves the cursor to the first character of the currently displayed line.
  • g^: Moves the cursor to the first non-whitespace character of the currently displayed line.
  • g$: Moves the cursor to the last character of the currently displayed line.
  • gm: Moves the cursor to the middle-most character of the currently displayed line.

Once you have “wrapped” your mind around this feature, you can take your editing to new levels of Zen.

To see more information and download your copy of the TKE code editor, visit http://tke.sourceforge.net.

Line Wrapping

Inserting Enumerations

I don’t know about you, but in the past, I’ve spent a lot of time editing files where I write a line of code which contains a number, duplicate that line a bunch of times, and then proceed to change the number in each line such that they increment by one. The following animated GIF illustrates the problem.

Wouldn’t it be nice if our editor helped us do this type of enumeration more quickly? With multicursor capability, TKE can make this editing task no longer a chore.

After creating the lines of code and duplicating them, hold the SHIFT and ALT/OPTION keys and click and drag a block selection on the numbers in each line. Once all numbers have been selected, select to the Edit / Insert / Enumeration menu option and enter the number “1” in the field at the bottom of the window followed by hitting the RETURN key. This will cause the first line to be numbered a decimal value of 1 and have each line be incremented by 1. Finally, hit the ESCAPE key to exit multicursor mode.


TKE also supports creating enumerated values for other bases besides decimal, including binary, octal and hexidecimal. Here’s a few other examples of how to specify the starting value (we’ll use our graphical example to show its effect).

  1. “32’dd10” => “This is line 32’d10. This is line 32’d11. This is line 32’d12…”
  2. “b0+2″ => “This is line 0. This is line 10. This is line 100…”
  3. “0oo6” => “This is line 0o6. This is line 0o7. This is line 0o10…”
  4. “0xxf-1″ => “This is line 0xf. This is line 0xe. This is line 0xd…”
  5. “16’hhf” => “This is line 16’hf. This is line 16’h10. This is line 16’h11…” (i.e., ‘x’ and ‘h’ both indicate a hexidecimal number)

By default, if nothing is entered in the number entry field and the RETURN key is pressed, a decimal value of 0 will be used as the starting value.

Special note for Vim users:
If you select the numbers using the “s” and “Shift-s” keys to cause multicursors to placed at the beginning of each number, you can use “dn” to delete the number and use “#” (pound key) to bring up the enumeration field. Super quick way to do this type of edit without touching the mouse.

So why risk repetitive strain injury? Use your time and keystrokes to get more complicated things done with TKE.

To see more information and download your copy of the TKE code editor, visit http://tke.sourceforge.net.

Inserting Enumerations

Default Open/Save Dialog Directory

Whenever you need to open or save a file/directory, the open/save dialog window will display the contents of a directory. Sometimes that directory is the one that you want, but other times you may find yourself constantly using the file system browser features in the dialog window to change the directory. This can get tiresome if you are doing this often, but TKE can offer some help by making the default directory smarter and more customizable.

To change the way TKE chooses the default directory in the open/save dialog windows, head on over to Preferences (Edit / Preferences / Edit User – Global menu option) and go to the General tab within the General panel.


The last option in the tab specifies “Set default open/save browsing directory to:” with a dropdown list containing four options:

  • Last accessed:  TKE will remember the last directory that was in use in an open/save dialog window and use that directory as the default directory the next time the open/save dialog window is used.
  • Current editing buffer directory:  The directory containing the file which is the current editing buffer will be used as the default directory.
  • Current working directory:  The current working directory will be used as the default directory. The current working directory is always displayed in the title bar of the main window and can be changed at any of the methods discussed in our Current Working Directory post.
  • Use directory:  When this option is selected, a directory selection window will be displayed. Use it to navigate to the directory that you want to use as the default directory for subsequent open/save dialogs. The selected directory name will be displayed in the preferences window.

You can change this preference option at any time and, like most TKE preference changes, its selected value will be immediately applied within TKE.

If you using TKE in Vim mode, you can also change this option without needing to open Preferences. Just use the :browsedir value (or :bsdir value) command option and in place of value, use the values of:

  • last: Same as “Last accessed”.
  • buffer: Same as “Current editing buffer directory”.
  • current: Same as “Current working directory”.
  • Or specify the absolute or relative pathname of the directory to use.

Note that changing the default directory using the Vim command will not be remembered when you quit TKE (the preferences value will be the one used upon application startup), so using this method is a terrific way to temporary override the current behavior.

Sweet.

To see more information and download your copy of the TKE code editor, visit http://tke.sourceforge.net.

Default Open/Save Dialog Directory

Auto-completing HTML/XML tags

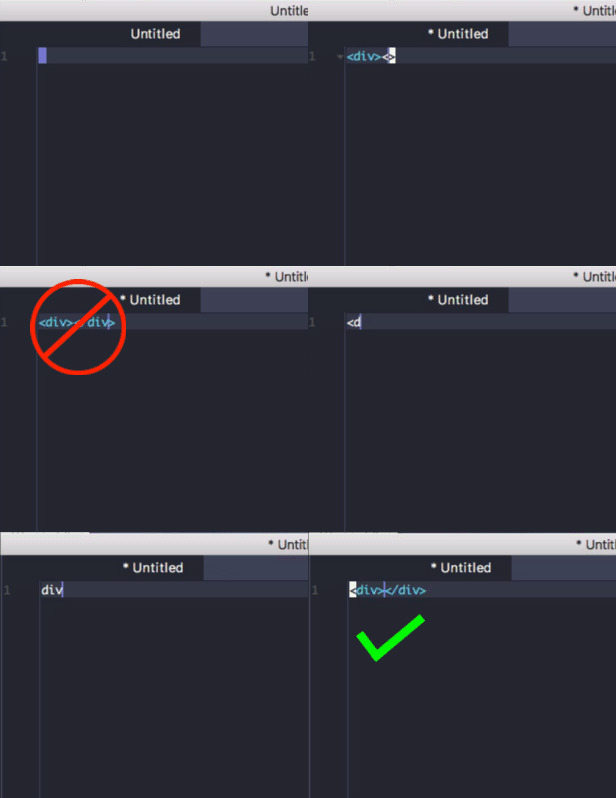
HTML editors have many different methods for handling the auto-completion of tags, that is, when an opening tag is entered in the editing buffer (i.e., “<div>”), the closing tag is inserted immediately after by the editor, saving the user time and keystrokes. Various editors use different strategies for detecting when/how to auto-complete:

  1. When the opening tag is completed (with the closing “>” character).
  2. When the start of the closing tag (the “</” characters) is entered and then use some inference logic to insert the correct closing tag.
  3. Do nothing at all.

Each of these solutions have their pros and cons. For example, solution #1 generally performs quickly since it is relatively easy to get the just entered tag name; however, if the user only wants to insert a starting tag at the current insertion point, the editor is inserting text that the user will now have to spend time removing, saving no time and perhaps taking a bit more time to edit. Solution #2 doesn’t have the downside of #1 since the editor only inserts the closing tag when/where the user chooses; however, it can have a bit of a performance impact since the editor needs to infer which closing bracket to insert. Solution #3 has the most flexibility, but obviously doesn’t attempt to help the user in the more common cases.

For HTML/XML tags, TKE takes a slightly different approach to tag auto-completion, relying on its built-in Emmet support. To insert a tag with Emmet, simply enter the name of the tag without the angled tag brackets and enter the Control-E shortcut. This will replace the tag name with both the starting and closing tags as shown in the animated GIF below.

img-alternative-text

If you need to wrap a block of text with a given tag, select the text to wrap, and select the Edit / Emmet / Wrap With Abbreviation menu option. An entry field will be displayed at the bottom of the window, allowing you to enter the tag name to wrap. After entering the tag name, hit the RETURN key to cause the opening/closing tag to be inserted around the selected text. What is even cooler is that TKE will adjust the indentation so that the code looks good after the insertion occurs.

Using Emmet for tag auto-completion has all of the upsides without the downsides since it gives the user all of the control and then some.

To see more information and download your copy of the TKE code editor, visit http://tke.sourceforge.net.
Auto-completing HTML/XML tags

Sidebar Ordering and Keyboard Selection

A couple of quick sidebar tips for you.

Tip #1: File/Folder Ordering

Depending on your operating system and personal preferences, you may be more accustomed to having all of the folders grouped at the top of a folder’s listed contents while all files are listed below. Or perhaps you prefer to have your files and folders intermixed in alphabetical order. Whichever way you prefer to view files/folders in the sidebar, TKE has you covered.

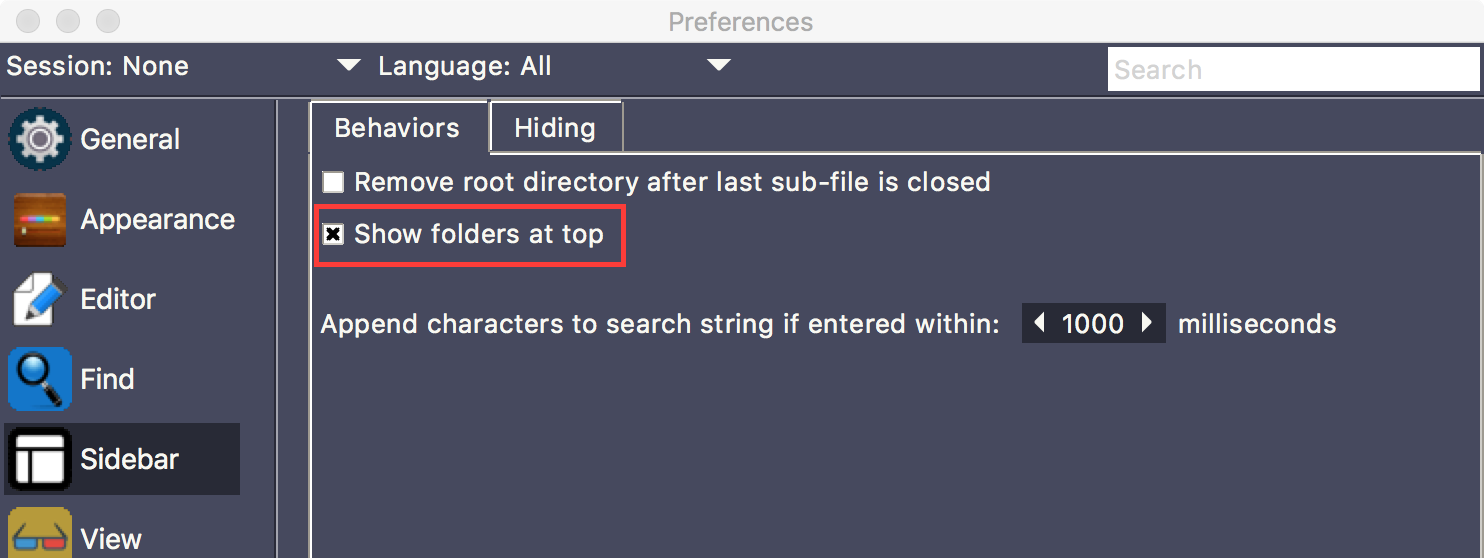
To switch the sidebar file/folder ordering, head on over to preferences (Edit / Preferences / Edit User – Global menu option), select the Sidebar panel and make sure that the Behaviors tab is selected. Simply toggle the checkbutton labeled Show Folders at Top to cause the sidebar to display folders first or folders intermixed.

image-2

Tip #2: Keyboard Selection

If the sidebar has keyboard focus, you can quickly select a file or folder within the current folder by typing the name of the file. As long as you enter the successive characters within a second of each other (the default time), the characters will be appended to the current search string; otherwise, waiting beyond a second will cause the search string to clear out and entering another key will select the first file/folder matching the new search string.

If one second between characters is not enough or too much time, you can adjust the value within the same Sidebar / Behavior tab within preferences, by increasing/decreasing the Append characters to search string if entered within: value.

And since we are on the topic of using the keyboard within the sidebar, you can always select the parent folder by hitting the left arrow key and you can open the currently selected folder by hitting the right arrow key. This means that you can quickly change the selection of any file/folder within the sidebar using only the keyboard.

Your mouse or trackpad might get a bit lonelier with these tips.

To see more information and download your copy of the TKE code editor, visit http://tke.sourceforge.net

Sidebar Ordering and Keyboard Selection